
 6919
6919
Background
When you log in to HMIS you will begin on the Search page where you can search for clients by their first name, last name, Social Security Number, or Date of Birth. Before creating a new client, you should search by any of these identifying pieces of information to make sure that the client does not already have a record in HMIS. Follow these instructions to learn how to do this.
If the client already has a record in HMIS, you can click on the result in the Search bar to go to the client's record and make any necessary edits before enrolling the client into your project.
This video contains most but not all of the same information in this lesson.
Searching For A Client
Review Clarity's Knowledge Base article to learn more about How to Use the Search Bar Feature.
Adding a New Client Record
Step 1: Look up the client's name on the Search Box to make sure they do not already have a record on file.
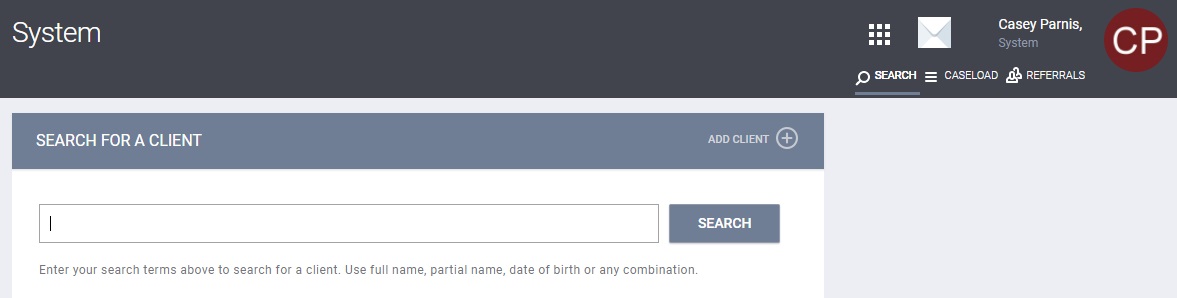
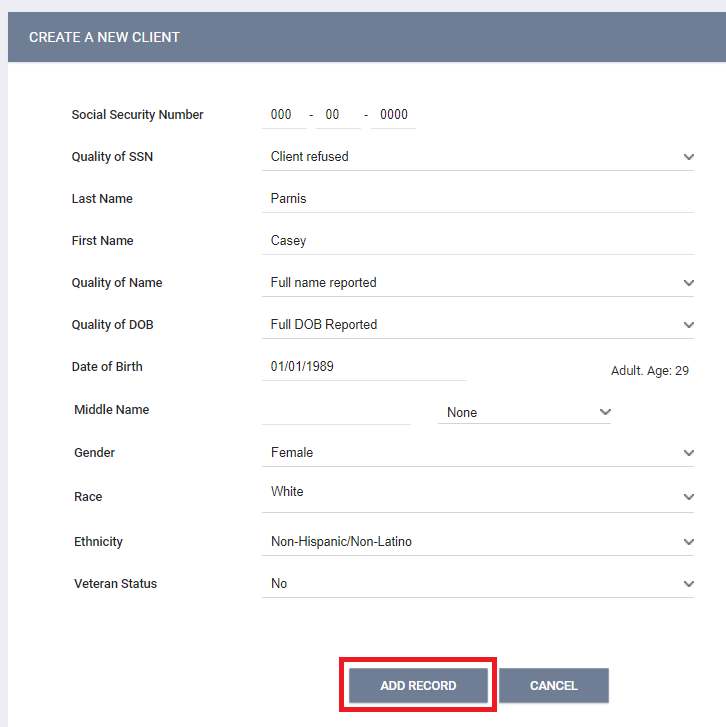
Step 2: Click on the Add Client icon on the right side of the Search Bar, this will take you to the Client Profile creation page, and you will fill out each field and then click the Add Record button to save the client record.
Identifying client information such as Name, Date of Birth, and Social Security Number, should be entered for the client if they were provided regardless of whether or not the client signed a client consent form. Client consent is nor required in order for identifying information to be entered into HMIS if only the agency working with the client has access to the data. Please review our Knowledge Base article on Accessing and Completing the Release of Information to get more information on setting sharing permission for the clients.
NOTE: Last Name comes before First Name in the Create a New Client form.
Data Quality Codes
Name Data Quality
- Full Name Reported – The client has provided their full First Name and Last Name.
- Partial, street name, or code name reported – The client has reported part of their name or a street/code name.
- Client Doesn’t Know – The client doesn’t know their First and Last Name.
- Client Refused – The client refused to give their First and Last Name.
- Data not Collected – The intake worker did not ask the client for their First and Last Name.
DOB Code
- Full DOB Reported – The client has provided their day, month, and year of birth.
- Approximate or Partial DOB Reported – The client has provided their day, month, and/or year of birth, but not all three. If a client knows how old they are but not the day or month they were born on, calculate their year of birth based on their age and enter 1/1/____ and fill in their year of birth.
- Client Doesn’t Know – The client does not know their Date of Birth or age.
- Client Refused – The client refused to give their Date of Birth or age.
- Data Not Collected – The intake worker did not ask the client for their Date of Birth or age.
NOTE: If Client Doesn’t Know, Client Refused, or Data Not Collected is selected for the client’s DOB code, the DOB field should be left blank.
SSN Code
- Full SSN Reported – The client has reported their full nine digit Social Security Number.
- Approximate or Partial SSN Reported – The client reported only part of their nine digit Social Security Number.
- Client Doesn’t Know – The client does not know any part of their Social Security Number.
- Client Refused – The client refused to give any part of their Social Security Number.
- Data Not Collected – The intake worker did not ask the client for their Social Security Number.
You must complete the client's demographic information and the Release of Information before the add record button becomes visible.
Release of Information
Release of Information fields are located at the right of the screen. This section is used to document whether or not the client gave their permission to have their personal information shared with other agencies in HMIS.
Please note - unaccompanied minors (a single client age 17 or under, or a household where all clients are 17 or under) CANNOT consent to share their personal information in HMIS. In this case, Permission should be set to No, and the Consent Refused toggle must be turned on.

Complete the following fields on this section:
- Permission
- Yes - Client provided consent to share their information in HMIS
- No - Client did not provide consent to share their information in HMIS
- Start Date: This is the date that the client signed the ROI. The Start Date defaults to today's date, but it must be configured to reflect the actual date the ROI was signed by the client, if it was not signed on the current day.
- End Date: This is the date that the ROI will expire. It will default to the expiration date configured by the HMIS System Administrator.
- Documentation: Enter the way in which the ROI was stored. There are several options listed:
- Electronic Signature - If Electronic Signature is selected, a button stating e-Sign Document will be present. Click on it to complete the electronic signature form. The client can sign the form with their finger or stylus if your agency has purchased a signature pad, or using the computer's mouse if your agency does not have a signature pad. If this method is used, 211OC highly recommends that you print a PDF copy of the signed form from Clarity and add it to your client's paper file in case of an audit.
- For households with minor children, have the adult guardian e-sign for the minor child.
- Attached PDF - This will prompt the end user to upload the PDF, which must be the Consent To Share Protected Personal Information form.
- For households with minor children, make sure the attached PDF contains the minor children's information. You will need to upload the document for each minor child in the household.
- Signed Paper Document - This means that the agency is storing a copy of the Consent To Share Protected Personal Information form outside of HMIS. You will be prompted to enter the location where this is stored. You can enter the agency's name or project name where this form is stored for this client.
- Electronic Signature - If Electronic Signature is selected, a button stating e-Sign Document will be present. Click on it to complete the electronic signature form. The client can sign the form with their finger or stylus if your agency has purchased a signature pad, or using the computer's mouse if your agency does not have a signature pad. If this method is used, 211OC highly recommends that you print a PDF copy of the signed form from Clarity and add it to your client's paper file in case of an audit.

