
 1614
1614
Background
In order to participate in the Coordinated Entry System or the Bed Reservation System, Housing Providers must first enter their available housing opportunities into HMIS. These opportunities will be sent to a Matchmaker, who will then refer households to the available housing opportunities. Once a household is matched to a housing opportunity, the Agency Administrators at that agency will get an email notification alerting them of this, and they will need to review the household and either accept the household into their project, or return the household to the Community Queue. This article will review how to manage this process.
Within This Article
- Referral Tab Overview
- Adding and Editing Housing Opportunities
- Reviewing a Pending Referral
- Accepting a Referral
- Denying a Referral
Referrals Tab Overview
The Referral Tab is at the top right corner of the main search screen. To gain access to this page, you will need to complete the HMIS Coordinated Entry Training. On this page you will be able to see the following 5 tabs:
- Pending: Shows all households currently matched to a housing opportunity at your agency that are pending
- Community Queue: Shows all heads of household waiting to be matched to a housing opportunity in the CoC for the Coordinated Entry System and the Bed Reservation System
- Completed: Shows all households that were enrolled into a project within your agency as a result of being matched to a housing opportunity
- Denied: Shows all households that were matched to a housing opportunity at your agency, but were denied either because the household did not meet the project eligibility, or the household denied the housing opportunity
- Sent: Shows all referrals sent by your agency to outside agencies (this will generally be blank for all agencies except the Matchmakers, or CES Leads)
- Availability: Where agencies can update their bed availability in order to receive matches

Adding and Editing Housing Opportunities
Adding Housing Opportunities
Each housing agency is responsible for entering and updating any housing opportunities at their agency. This can be done by accessing the Availability tab on the Referrals page. Each agency must enter their project's housing opportunities in order to receive matches from either Community Queue.
Step 1: Ensure your housing agency is listed in the Agency drop-down below your name. Then, click on the Referrals button.

Step 2: Select the Availability tab on the Referrals page. A list of all the projects for your agency will appear. Click on Limited Availability for the project with the housing opportunity if not already selected. Then, click on the drop-down button next to the project. You will have the option to Add Single Opening or Add Multiple Openings.
*Please note, a project should never be set to Full Availability because openings for the project will not appear on the Available Housing Opportunities report.

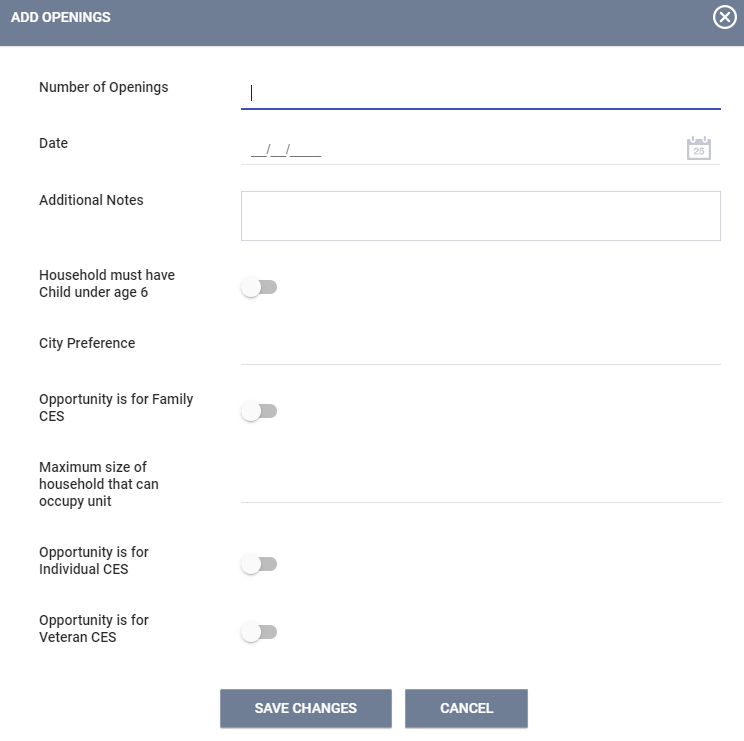
Step 3: After selecting if you would like to enter one opportunity or multiple opportunities, complete the following information in the pop-up window.
- Number of Openings: The number of openings being added (This will only appear if multiple openings was selected)
- Date: The date the opening became available.
- Additional Notes: Enter any criteria specific to the unit, or any preferences the project may have for matching clients. Eligibility requirements have already been set-up for the project, and should not be included in this section.
- For Emergency Shelter or Transitional Housing opportunities, please include the unit number.
- Household must have child under age 6: If the project is required serve a household with child under the age of 6 in this unit, check this box.
- City Preference: If the project receives funding that prefers to serve clients from a specific city or cities, enter the name of the city or cities.
- Opportunity is for Family CES: Check this box if the opportunity is for a household in the Family Coordinated Entry System.
- Maximum size of household that can occupy unit: If applicable, enter the largest number of household members that can occupy this unit.
- Opportunity is for Individual CES: Check this box if the opportunity is for a household in the Individual Coordinated Entry System.
- Opportunity is for Veteran CES: Check this box if the opportunity is for a household in the Veteran Coordinated Entry System.
- Click on Save Changes.
Editing Housing Opportunities
Once a housing opportunity has been created, the opportunity can be edited or deleted on the Availability tab of the Referrals page by clicking on the drop-down for the project, and clicking on the Edit or Delete buttons next to the housing opportunity.

Reviewing a Pending Household
Once a Matchmaker has matched a household to a housing opportunity, the housing provider must review the match and determine whether or not the household is eligible for the project. Agency Administrators will be notified via email when a household has been matched to a housing opportunity at the agency.
Step 1: Ensure your housing agency is listed in the Agency drop-down below your name. Then, click on the Referrals button.

Step 2: Select the Pending tab, where you will see all of the households that are currently matched to housing opportunities at your agency. Search for the name of the Head of Household you would like to review, and click on Edit.

Step 3: Change the status of the referral to Pending – In Process and click on Save Changes to signify that the match is being reviewed.

Step 4: Review the referral page, including the Referral History and any Notes provided regarding the referral.

Step 5: To access the household’s contact information, navigate to the Head of Household’s Contact tab which should include the client’s phone number and/or email.

Accepting a Referral
Once the housing provider has determined that the household is eligible for their project and the household has confirmed that they wish to be assisted by the project, the case manager should enroll the household into the agency's housing project. For Emergency Shelter and Transitional Housing projects, the household should be enrolled on the date they start occupying the unit. For Permanent Housing projects, the household should be enrolled on the date the household was admitted into the project, not the date the household is placed in a housing unit. Households referred to a housing opportunity through the Coordinated Entry System will also need to exit the household from the Coordinated Entry System project.
Enrolling the Household into the Housing Project
Step 1: Ensure your housing agency is listed in the Agency drop-down below your name. Then, click on the Referrals button.

Step 2: Select the Pending tab, where you will see all of the clients that are currently matched to housing opportunities at your agency. Search for the name of the Head of Household you wish to enroll, then click on the client’s name to be directed to their Client Profile page.
*Please note, you could also Search for the name of the client using the regular search feature
Step 3: Click on the Programs page in the top menu of the client record. Click on the down arrow next to the project the household was referred to under the Programs: Available section.

Step 4: After clicking the down arrow, the section will expand and provide the following information.
- Program Placement a result of Referral provided by (Matchmaker): If the household was referred to your project through the Coordinated Entry System Community Queue or the Bed Reservation Community Queue, you will be informed that the head of household has a pending referral for the project. Ensure this checkbox is checked in order to track the referral on the head of household's History page.
- Include group members: Remember to include any household members that are enrolling into the project with the head of household. Select the switch under the Include Group Member section.
- Click on Enroll.

Step 5: Complete the enrollment process as outlined in the Enrolling Clients in a Project knowledge base article. If the household was matched to the project through either Community Queue, the head of household will automatically be removed from the Community Queue. On the Referrals page, the Head of Household will now appear under the Completed tab because they have successfully been placed in a housing project. Please note that if the household was on both Community Queues, the household will only be removed from the queue they were referred from.

Exiting the Household from the CES Project (CES Only)
Households placed in Permanent Housing projects should remain active in the Coordinated Entry project until the household has been placed in a housing unit. Once this occurs, the household needs to be exited from the Coordinated Entry System Project by the Housing Agency. This does not happen automatically. Households enrolled in a project through the Bed Reservation System project should not be exited from the CES project unless they no longer require assistance with obtaining permanent housing.
Step 1: Switch to the agency where the Coordinated Entry enrollment was entered. For Individual CES and Family CES, this would be the County of Orange.

Step 2: Go to the Head of Household's Program page, and click on the Edit button next to the Coordinated Entry System project enrollment. Complete the exit process as outlined in the Exiting Clients from a Project knowledge base article for all clients in the household.
The household's exit date should match the date the household was placed in a housing unit for Permanent Housing projects. The Destination field should match the type of housing the client was placed in. Below are the project types a household can be referred to, and the corresponding destination that should be entered.
- Rapid Re-Housing Projects: Rental by client, with RRH or equivalent subsidy
- Permanent Supportive Housing or Other Permanent Housing projects: Permanent housing (other than RRH) for formerly homeless persons
- Projects with "Other" project type: Select the destination that most closely matches the function of the project. In most cases, these projects function like Rapid Re-Housing.

In order for a successful referral through the Bed Reservation system to be recorded, the housing agency must have enrolled the household into one of their projects and indicated that the program placement was the result of a referral.
In order for a successful referral through Coordinated Entry to be recorded the following must occur:
-
The housing agency must have enrolled the household into one of their projects and indicated that the program placement was the result of a referral.
-
Once the household has been placed in a housing unit or Transitional Housing project, the housing agency must exit the household from the Coordinated Entry System project with a Destination that matches the type of project they were enrolled into.
Denying a Referral
After a household has been matched to a housing opportunity, the agency may need to deny the referral. Some reasons this could occur is due to the household not being eligible for the project, the household deciding they did not want to be housed by the project, or the household fell out of contact with their case worker. If any of these situations occur, please follow these steps to deny a household that was matched to a housing opportunity.
Step 1: Ensure your housing agency is visible in the Agency drop-down. Navigate to the Referrals page.

Step 2: Select the Pending tab. Search for the name of the Head of Household you would like to review, and click on Edit.

Step 3: Scroll to the Status section, and select the Denied option in the drop down. Once that has been selected the screen will expand with more options. Complete the fields below, then select Save Changes.
- Send to Community Queue - If the household was referred to the project through the Community Queue, there will be an option to return the household to the Community Queue. Selecting:
- Yes means the referral will be sent back to the Community Queue, and the household can be matched with another housing opportunity.
- No means the referral will be sent to the Denied tab, and the household will not be matched to a housing opportunity. The user should only select No if the household no longer needs to be housed through the Community Queue.
- Denied by Type - Select who was the determining party for the denial, the client or the housing provider. This selection should coincide with the denied reason below.
- Denied Reason - Select a reason for denial from the drop down menu. The table below outlines the possible reasons for denial, and whether the reason for denial should be considered a denial by the Housing Provider or the Client.
| Client | Housing Provider | |
| Client Deceased | x | |
| Client did not show up or call | x | |
| Client out of Jurisdiction | x | |
| Client previously received service | x | |
| Client refused services | x | |
| Denied by Landlord/Property Manager | x | |
| Disagreement with rules | x | |
| Falsification of Documents | x | |
| Full Capacity/No Availability | x | |
| Incorrect Match to Agency | x | |
| Lack of Eligibility | x | |
| Needs could not be met by program | x | |
| Referral time expired | x | |
| Self Resolved – Client Housed | x | |
| Voucher expired | x | |
| Other | x | x |
The 'Other' reason for denial should only be used if no other option appropriately captures why the denial occurred. Below are common 'other' reasons for denial that have been recorded in HMIS, and the appropriate reason for denial that should be selected in the Denied Reason field.

- Denied Message - This option allows you to enter any pertinent information regarding the referral for staff at other agencies.

Once the household has been denied the housing opportunity, the opportunity will become available for another household to be matched to. A list of all Heads of Households whose referrals were denied by your agency is available on the Denied Tab.


